

News & Updates
Installation and Maintenance Tips of your Basco or Thermal Transfer Shell & Tube Heat Exchanger
Installation
Unless noted on your Thermal Products supplied data sheet and/or drawing, it is preferable to flow the cooling media through the tube side and the hot media through the shell side, except when the hot fluid is dirty or is prone to fouling. This is to aid in the cleaning of the tubes since the tubes can be mechanically cleaned. It is sometimes beneficial to pass the hot dirty media through the tubes.
Also note, when installing a single pass unit, the shell inlet must be at the same end of the exchanger as the tube side outlet (counter-current flow).
Please ensure that the cooling media is flowing first and off last to avoid the possibility of unwanted thermal expansion.
Operations
At startup or after maintenance, both, shell side and tube side should be carefully vented and full of liquid. Improper venting and fouling are the most common causes of the heat exchanger to not operate correctly.
To obtain maximum performance, the following precautions should be taken:
- Make sure all other equipment in the fluid circuits functions properly.
- Maintain rated flow of both fluids but be sure flow rates are not exceeding the design flow. Frequently, tube failures can be directly traced to excessive fluid flow, causing tube erosion and vibration failures. In the case of heavy oils, high flow rates can reduce cooler efficiency.
- A periodic venting program should be followed if air or vapor tends to accumulate in the system.
- Observe a regular maintenance program.
Inspection
A periodic inspection and maintenance program should be followed with any heat exchanger. To ensure continuous satisfactory performance of your Thermal Products provided shell and tube heat exchanger, the following steps should be taken:
- Inspect filters in the system and replace or clean as required.
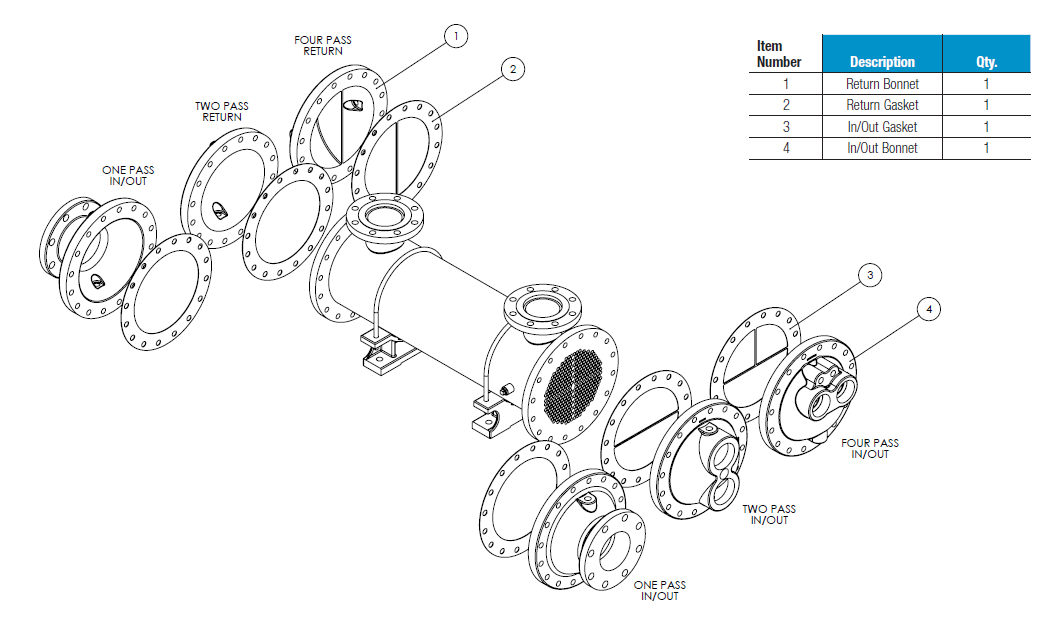
- Remove bonnets/heads from the heat exchanger and inspect the zinc pencils (if present) for erosion or oxide deposits. Scrape to bright surface and replace if more than half has corroded away. Contact Thermal Products for any parts you might need.
- Carefully examine tubes for scale, and clean if necessary. After cleaning, examine for erosion or corrosion.
Cleaning
The interior surface of the tubes can be cleaned in several ways. Many deposits can be removed by flushing a high-velocity stream of water through them. For more stubborn deposits, wire brushes or rods can be used. Be careful not to perforate a tube or damage the tube-to-tube sheet joint.
Both the shell side and tube side can be cleaned chemically by circulating solutions through the heat exchanger. For most deposits, a mild Oakite, Rydlyme or descaling solution is satisfactory. Circulate the cleaning solution until the heat exchanger is clean. Be sure to wash out all chemicals thoroughly with clean water before returning the heat exchanger to service.
Any questions on your shell & tube exchanger installation or any maintenance questions, please reach out to your local Thermal Products office.